

Curvy alignment is an art. I don’t say that to be cute but rather because I think it’s particularly true. When we look around us, most of the yoga resources available to teach us poses show either a very thin body or an anatomical model [aka a skeleton]. Neither is super helpful when you have curves.
While our poses may look a little different from an anatomical model [thank goodness, right?], that doesn’t mean they’re not aligned. The first time I saw a picture of myself in Side Angle Pose, I was shocked. As in, completely.
All this time I’d thought I was aligned, but when I looked at the photo, I thought my knee looked locked and that my hip was completely misaligned.
So I came into the pose again, building it up bit by bit in front of a mirror to confirm. And that’s when it hit me: what I’d seen as misalignment was actually just the shape of my body. Because I was used to seeing straight lines and angles in yoga books, I hadn’t realised how different it looked on my body. What a revelation.
I encourage you to approach alignment from the inside out—feeling the alignment in your body while also doing your best to set yourself up safely.
Feet
If your feet have a tendency to roll in or out [as many of ours do for a variety of reasons—genetics, injury, etc.], you have an extra special job to do: press them down firmly. Pretty much all the time. Grounding your feet can keep you stable in your poses and can also help you build strength in your feet and ankles to keep you safe, both on and off the mat.
If your feet have a tendency to roll in or out, press them down firmly. Pretty much all the time
If you have any type of foot pain [plantar fasciitis, heel spurs, swelling, etc.], consider taking a shorter stance in standing poses. Sometimes the feet can really be grippy in standing poses because they’re trying to do all the work of keeping your body upright. So whether you’re feeling discomfort in the feet for one of the reasons above or another reason, experiment with a shorter stance. You might also alternate between front- and side-facing poses to give the feet some variety in the work they have to do.
Knees
If I had to name the number one complaint I hear from my students, it’s knees. So let’s break it down [not literally—ouch!]. Pain in the knees usually shows up in two forms: crunching/pain when moving and discomfort when kneeling.
Crunching/pain when moving
When moving into standing poses where the knee is bent [such as Warrior 1, Warrior 2 or Side Angle], go slowly. There is no blue ribbon for rocketing your knee straight down to 90 degrees [although there may be a wrist bracelet if you go too far and end up at the doc’s office]. Instead, move slowly into the pose on your own breath.
For example: “Inhale, bend your knee. Exhale, straighten your leg.” Do this a few times and use it as a guide for where is a good place for your knee to be. That way when you’re ready to hold it, you’ll know where to go.
Pain when “standing” on knees
If you have pain in kneeling poses, you have a few options:
- Don’t do them. Seriously; there are plenty of other good choices, so why risk something as valuable as your knee?
- Do the pose in a different way.
- If you’re pretty much okay on your knees but just don’t like the feeling of your knee digging into the hard ground [and who does, really?], try placing a blanket under your knee and see if that helps. If not, go for option 1 or 2 above.
Legs
We’re often taught to practise Standing Mountain, or Tadasana, with feet together or, at the most, hip distance apart. However, because of our flesh [especially around the thighs], this position [especially feet together] can be uncomfortable at best and unsafe at worst. For example, in my body, if I stand with my feet together, my knees buckle out.
Throwing my body out of alignment to conform to a narrow [literally] idea of a pose is not yoga! If the same is true for you, scrap it! Step your feet a comfortable distance apart and then build your alignment from there. You’re still safe doing it this way—and, in fact, if this is what is best for your body, you’re actually safer.
Shoulders
Many curvy folks have gotten the message—both implicitly and explicitly—that we should take up less space in the world. That our body is not okay and we should change it. Besides the obvious emotional toll this kind of message can take, it can also have an effect on our body. On a subconscious level, we may close down our heart and try to hide a bit from the world. When that happens, it can cause our chest to collapse and shoulders to round in a bit as we try to take up less space, and even an imperceptible amount of this can make a big difference in how you feel in a pose [and in your life].
So lift your sternum and broaden across your collarbones. You have arrived! And you’re gonna take up however much space you dang well please.
Wrists
Wrists are delicate and finicky creatures. And they can cause discomfort in yoga poses—especially poses with an arm balance component like Downward Facing Dog. If your wrists are giving you any trouble in a pose like that, here are a few things to try:
- Roll up the front edge of your mat and place the roll at the centre/back of your hand. This can take a little pressure off the wrists,
- Use a yoga wedge to do the same thing,
- Make fists with your hands and do the pose on your fists [bottom of the hand on the ground, not knuckles],
- Holding onto 3- or 5-pound dumbbells can create a similar effect to option 3 but may be easier on the hands for some people because the dumbbell is bearing the pressure into the floor,
- Do another variation of the pose, perhaps with the wall or a chair, that may involve less wrist pressure.
A word on knee and hip replacements
If you have had a knee or hip replacement, you are not alone. My advice is to follow your doctor’s advice on what is best for you. Once you’re operating within those parameters, follow the feel good principle. If it feels good, go for it. If not, find another alternative that does.
Okey doke, now we’re gettin’ to some good stuff! Here are a bunch of suggestions for making your practice curve-specific and comfortable:
Booty
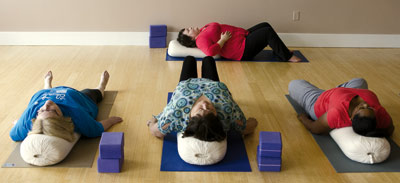 When you have a little more to love in the booty department, it can make it difficult to lie on your back comfortably. It can cause your upper back and neck to get crunched as well as your lower back.
There are several options here:
- Take your Savasana, or final relaxation pose, in a different position that you find more comfortable,
- Place a blanket under your head; this is sometimes enough to align the neck and shoulders more comfortably,
- Put a bolster or rolled-up blanket under your knees to release your lower back,
- Some combination of 2 and 3 that works for you. Feel free to use these tips in any lying down poses that you’d like.
Belly
I think the belly is the area that makes curvy people most uncomfortable—physically but also emotionally. We’re not usually taught to touch, much less love, our bellies!
I usually recommend two things to give bellies a little more space:
- step your feet wider and
- move the belly skin.
Stepping your feet wider works well in standing poses [such as standing forward bend] and seated poses [such as seated forward bend]. When the feet are too narrow in these positions, the belly can feel stuck, or compressed, by the legs. Stepping the feet wider can reduce or eliminate the issue; feel free to go mat-width or wider—whatever you need to feel good!
Moving the belly skin itself is also a radically awesome option. It’s radical not only because it works so well but because it gets you in touch [literally] with your belly, which is something we can probably all benefit from. I usually offer two options for this: [1] lift the skin up or [2] tuck the skin down. I personally prefer the latter, but I’ve come to find that it’s largely a matter of personal preference. Some people find more help with lifting, others with tucking. I say whatever floats your boat is a-ok!
In a nutshell, though, it’s about as easy as it sounds: take your hands to either side of your belly, closest to your hips. Either move the skin up and out or tuck it down toward your pelvis. Remove your hands and voila! You now have a little more room to move comfortably into your pose.
Motivation
One of the most rewarding [and simultaneously challenging] parts about beginning or continuing a yoga practice is the dance you have to do with motivation.
When I consider getting on my mat, resistance comes up for me as often as not. For a long time [as in years and years and years], this made me frustrated. I immediately switched into “hard on myself” mode. I didn’t understand how I could be so fundamentally flawed that I couldn’t just get on my mat without complaining like surely every other yogi in the world must be able to do.
One of the most rewarding [and simultaneously challenging] parts about beginning or continuing a yoga practice is the dance you have to do with motivation
And then I started casually talking with other yogis about this, and it hit me: this isn’t a unique problem. This is something everyone faces [and I’m not exaggerating. I’m willing to wager that every person who has ever intended to have a regular practice has struggled with keeping it up from time to time].
Here’s what works for me: when I feel resistance come up [usually in the form of reasons why I can’t practise—don’t have enough time, don’t feel like it, want to do something else instead, I’ll do it later—which turns into never, etc.], I use it as an opportunity to check in as quickly as possible. As soon as I notice it’s happening [which isn’t always soon], I’ll stop and ask myself some variation of “What’s really going on here?” And what I find is always informative.
Sometimes I find that I’m feeling overwhelmed. Other times I’m feeling tired. Yet other times I find I’m just falling into an old pattern. No matter what comes up, I get the opportunity to ask myself my favourite question of all time: “What could I do?”
Too often, I “should” all over myself. I “should” practise every day. I “should” practise for 90 minutes, not 10. I “should” include x or y poses in my practice. And on and on and on.
In case you haven’t realised it for yourself [but you probably already have], “should” starts with “sh” for a reason—because it’s a close cousin to “shackle.”
And that’s what “should” feels like to me—shackles that keep me from my true practice. So I started practising “should to could.” In other words, instead of getting down on myself for what I “should” do, I started asking myself what I could do. I invite you to give it a try sometime: it changes the energy of the situation entirely. Should is contracting; could is expanding. When I ask myself what I could do, I always feel more creative.
I can almost always find something I could do, even if just for a few minutes. And I also feel more free when the answer isn’t yoga and is instead something like a nap—which is also really good yoga, in my opinion. I believe that identifying and meeting your true needs is yoga in action!
Excerpted with permission from Permission to Curve by Anna Guest-Jelley